Assignment One – Workflow
The object of this assignment is to demonstrate my understanding of “Workflow” and what I have learnt throughout Part One of this course.
My images for this assignment are based on the changes in colour of foliage, during the season of Autumn. The majority of pictures were taken at Westonbirt Arboretum (Tetbury, Gloucestershire), whilst the remaining were captured whilst out walking and inside my house.
Equipment
Cameras – Nikon D4 & D800E
Lenses – 24/70 – f2.8 & 105 – f2.8 (Macro)
Ancillary Equipment – Tripod
Method & Approach
For this assignment I took almost four hundred pictures and during the process of explaining my own workflow, I have reduced this amount down to just twelve images.
Please see pictures and captions below.
All pictures have been compressed hence there might be a quality reduction when enlarging.
Filing system and relevant sub structures
Before showing my personal process of camera to final image workflow, I thought it would make good sense to show screen shots of my filing system and its relevant sub structures of where I save my initial and processed images.
Picture 1 – Master folder
Comments – Shown here is a screen dump of my filing system and on the left we see at the very bottom just above the word ‘Network’ (and icon) both my attached hard disk drives. Both drives are identical in size and structure and pictured here is a screen dump of 1_Photo’s Main Disk (Q). Each folder name follows the same format of – Next Numerical Number _ Camera Model – Location or Title (DD_MM_Year). Each year I create a new Directory laid out exactly the same as last years (what’s shown here) and at the point of external hard disk space hitting 50% I back everything up twice onto DVD. After checking the DVD’s for errors and ‘only when happy’ I delete the newly copied sub folders from the external hard disks to free up space. Even now and having done this several times, I still never feel comfortable with the deleting part. I then store one of the disks at my mothers house, the other at home for access if and when I need it.
Picture 2 – Typical sub folder
Comments – This picture shows a typical Sub Folder when double clicked and opened from the Master Folder. Inside we can see –
(1)_NEF_Originals
This folder contains all the original RAW pictures straight out of the camera, this is the folder I open in Adobe Bridge (see below) and begin my process of selection (NEF is Nikons own terminology for their brand of RAW file).
(2)_Final Choice
This folder is an optional folder of my own choice, when my final selection process is complete I drag the very last finally selected files across to a new location. If the shoot was quite a large session with lots of images I find that working this way speeds Adobe Bridge up, I find its also cleaner to work like this.
(3)_Edits & History
Again, this folder is like the one above and is something of my own making, I like to work in a clean manner and having all the edited versions stored in one area can cause confusion, especially in six months time (just my opinion).
(4)_Final Jpeg’s – Edited & Ready for Printing
Upon final editing and having saved the final or finished image … i.e. no more processes, I save a Jpeg version and store it here. It allows me to view the finished file quickly at a later date without having to open up Bridge or Photoshop. If I need to compress any of the images for some reason, inside this folder I create another folder called ‘Compressed’ and store them here too.
1 – The moment the camera clicks
The very moment after a picture has been taken is when my workflow effectively starts, here we can see the cameras onboard histogram where I check the relevant pixel information just captured.
Picture 3 – Initial histogram viewing on the back of the camera.
Comments – In this histogram we can see that the complete pixel spectrum has been captured within the range of the cameras sensor.
2 – Copying images and renaming
As soon as I have finished a photo-shoot my next workflow process is to take the image files (both RAW & Jpeg) from the memory cards and copy them across to a designated location. During this process and at the same time the files are not only copied but also renamed. I perform this process by putting a memory card into the computers card reader and with Adobe Bridge running, I select from the file menu ‘Get Photos from Camera.’ From here a new screen appears where you select the memory card and the designated storage place (or in my instance an external hard drive) and then select the relevant folder, along with this opportunity comes the option to rename the files. Once the naming format has been set up Adobe Bridge remembers the format from the last time used, thus the naming exercise is merely that of changing a name and date. I find this means of importing both RAW and Jpeg files with the feature of simultaneously renaming, extremely efficient and since discovering this feature in Bridge I couldn’t think of any better way to import Jpeg & Raw files.
Of course … this is now and what the future holds is yet to be seen or released, but other than a newer update or different software package at present this is the best and most efficient way I currently know.
Picture 4 – Image naming process
Comments – Upon closer inspection of the above screen shot you can see I have already created and named two sub folders appropriately named Jpeg and NEF (Nikons own name for RAW files). After the renaming and copying process to my external hard drive has finished, I then drag the two differing file types to their relevant new folders. As mentioned above I do this to keep things cleaner amongst image types within my folders. With regards to these copied across directly from camera Jpegs there file sizes are of the smallest possible set within the cameras parameters. Some people would argue why do I need these Jpeg’s and why not just create a new set of Jpegs from the RAW files using Bridge and Photoshop, my answer to that is I sometimes like to compare what the camera produced compared to what my own final edits have likewise produced.
3 – Labelling system
With regards to making my choices, I use an image browser for this task (Adobe Bridge).
Picture 5 – Labelling system – Adobe Bridge
Comments – Shown in the picture above is my personal labelling system. I have renamed the coloured labels within Adobe Bridge to suit my own workflow, this makes my selection process more logical as the labels are now self explanatory.
With regards to my choice of wording on the fifth label, you will notice that I have put Selected for print (*****) right at the end of the label. Adobe Bridge also allows the user to give a rating to the image (up to five stars) and upon finishing all my edits to that particular image, I include a star rating to indicate that this is the final image ready for print. I do this as there might be three or four of the same image, each having different edits performed but all having a ‘purple label’ From here I also create a final Jpeg of the star rated image but save it in a separate sub folder (Final Jpeg’s – Edited & Ready for Printing), at a later date this just allows me quick access to my final choices of edited pictures.
4 – First pass
At this point and when I’m happy that everything has been successfully copied, renamed and the images open in Adobe Bridge from their new stored location, the memory card can be removed from the card reader, wiped clean and reformatted within the camera.
Picture 6 – First pass & initial rejection process – Adobe Bridge
Comments – This is my first stab at the selection process and it’s at this stage where I get rid of all the badly exposed and out of focus images. Above we can see a completed first pass with images labelled in red ready for rejection.
5 – Second pass
Moving on from ‘red labels’ comes the second selection process. These pictures are my second selection and are selected liberally, sometimes in large groups.
Picture 7 – Second pass process – Adobe Bridge
Comments – Shown in the screen shot above are ‘yellow labels’ and this is my second selection process. Upon completion, this selection represents images that could be considered, perhaps with a lot of editing or offer something that I like i.e. a pose, a look, the light, the subject.
6 – Third Pass
Shown here is my next stage of the selection process ‘my third pass’ and it’s here where I start to get serious about the picture.
Picture 8 – Third pass process – Adobe Bridge
Comments – This sequence shown above (‘green labels’) has been marked up as my third pass, here I take much more time and view each image at a much larger size on the screen, I also start to introduce much more criticism and judgement, the final selection of these images I class as my seconds.
7 – Fourth Pass
This is where it all becomes serious with my final choices, here I am looking for images that require next to nothing or very little editing as their composure, mood, sharpness and general feel are inviting. Having said that, I could also be looking at a picture that does need really working on, for example … the mood of the picture has a certain something or it creates excitement within me or I’ve seen something worth pursuing etc.
Picture 9 – Fourth pass process – Adobe Bridge
Comments – The sequence (‘blue labels’) has now been considerably reduced, showing just my final choices (prior to editing).
8 – Fifth Pass
This is it, crunch time. All pictures have been singled out and at this point I make the final decision as to what are my best images (to edit and later print). It is here were I finally label the remaining images with a ‘purple label’
Picture 10 – Final selection for editing
Comments – This sequence now shows my final selection of images which have made it through my selection process, each image will now go on to the next stage of workflow where they are individually edited.
9 – RAW editing process
Having finally selected a series of images for processing the next stage is to take each image and edit various parameters within the RAW environment. The edits performed to the image at this stage are non-destructive as all edits are written to a separate file and when the image is saved these edits are saved along side the RAW image in a corresponding XMP file.
Picture 11 – RAW editing process
Comments – Shown above is one of my final selected images opened in the Adobe RAW environment. This is the initial stage of the editing process where adjustments can be made to the pictures white balance, tonal values, straightening, cropping etc. These edits take place prior to opening the image in Photoshop.
Although Jpegs can be opened within the Raw editor and can also have several of their parameters adjusted (not as many as RAW) for this assignment the files used were all of RAW format.
Picture 12 – Editing – Camera profile selection window
Comments – Within the RAW environment, my first adjustment to any image is performed on the Camera Calibration page. Here I have my own saved presets of various light conditions for a variety of my cameras that I frequently use. These presets have been specifically set using a ‘colour checker passport’ and it’s relevant software to produce a profile then accessible within the Adobe RAW environment. Upon selecting one of these colour profiles accurately represents the cameras true colour balance. I used to take the passport with me on every shoot and start by taking three or four differing light conditions throughout the day but with the cameras I use, over time I have found the differences were so small that I could not notice any real difference. I have since set up several more of these specific profiles to suit more light scenarios. Below the profile selection there is also the option to enhance the RGB Hue and saturation. Sometimes after selecting the colour profile, a little adjustment on these sliders is all the image may need in the colour enhancing department. Personally I don’t like to over enhance as it can introduce too much enhancement and look false.
Picture 13 – Editing – Basic parameter window
Comments – Within the basic editing window a great amount of image character can be achieved, I find the pictures overall mood from the White Balance controls is achieved here (Temperature & Tint). The other sliders play their parts too, especially when working with the Histogram and with Shadow and Highlight Clipping warnings enabled.
Picture 14 – Editing – Individual colour balances in RAW
Comments – The HSL / Greyscale window is one of my favourite set of parameters. Again I go easy on these sliders whilst enhancing the captured picture but also I keep visual check on the histogram. Too much enhancement can make the picture look fabricated, sometimes even cartoon like (personal opinion).
 Picture 15 – Image crop process
Comments – Shown here is an image that I have decided to crop and the beauty here is that you can perform a designated crop and toggle between the ‘crop tool’ and the ‘hand tool’ to really gauge if the proposed crop edit is effective or still needs slight adjustment. I use all the editing tools available within the RAW environment, but shown here amongst my workflow are the more typical and basic everyday tools I most commonly use. Each image will be slightly different from the last and thus may require other editing processes, such as spot removal or the graduated filter tool, etc.
Picture 16 – RAW Image completion
Comments – Having made my edits to the RAW file, I then save the newly edited version as a DNG file (Digital Negative File) I do this by clicking on the ‘save image’ button (lower left hand side _ circled in red). Upon clicking this button a new screen appears on top of the current screen (as shown in this screen shoot) and here (marked up) is where I select the file type (DNG) and also the addition of a new prefix added to the original file name when saved. Although all the edits within the RAW environment are non-destructive I personally like to keep the original RAW file and also include a new file representing the edited RAW (saved as a DNG file). Basically, this is my own choice and my reason for doing this is if I take a break and come back to it later on … I know where I am as I have two visual files telling me that I have made my edits to one (the original RAW file) and with regards to the next edits I’m to use the DNG file. After selecting the ‘Save’ button in the Save Options window a new file is created next to the original, I then close the edited RAW file by hitting the ‘cancel’ button (middle button, lower right hand side _ circled in red) and this now closes the currently open RAW Editor and reverts back to the Bridge environment.
10 – Editing the DNG in Photoshop
Picture 17 – NEF & DNG files
Comments – Shown in the screen shot above are two identical pictures but on closer inspection they are in fact two different types of file. The top image is a DNG file whilst the bottom is the original RAW file and we can visually see that the DNG file is slightly more enhanced than the original RAW file, also as mentioned above both files now carry the ‘purple label’
Picture 18 – Opening the DNG File for editing in Photoshop
Comments – We open the DNG file in exactly the same way as we opened the RAW file in Bridge, only this time when the RAW editor opens we don’t make any edits (as they have already been made) this time we immediately select the open button in the lower right of the window (next to the cancel button, see picture sixteen). Photoshop now starts as shown in the screen shot above and begins to process the edits made earlier from within the RAW environment, upon completion the image then opens with the included edits from earlier.
Picture 19 – DNG file open in Photoshop
Comments – Following on from picture eighteen, picture nineteen shows the edited DNG file open within the Photoshop environment complete with the edits performed earlier from the RAW editor.
Picture 20 – Editing in Photoshop
Comments – To keep things simple with regards to editing in Photoshop, I have shown only one of its countless editing functions. The screen shot above shows a widely used function from one of the pull down menus for sharpening.
Picture 21 – Saving the edited DNG File as a PSD & Jpeg
Comments – Upon completion of all the editing undertaken in Photoshop, I then like to save two versions, a PSD file (Photoshop’s own derivative) and finally a Jpeg. Highlighted in the ‘Save as’ menu shown in the screen shot above are the two formats I use.
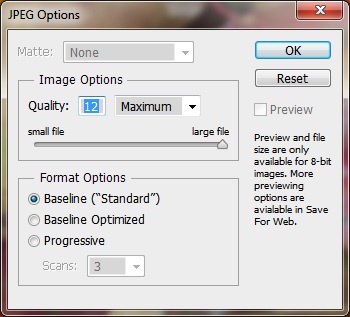
Picture 22 – Saving the edited DNG File a Jpeg
Comments – When saving the Jpeg file, a follow on window appears asking for ‘Image Options’ as shown above. My personal preference here is that I always select the Quality Maximum of 12, if from here I need to reduce the file size, I compress this Jpeg in another program. From personal experience it makes a nicer file with signature options too.
11 – Star rating
Picture 23 – Star rating the PSD & Jpeg files
Comments – Shown above in this screen shot are four file types, these are my four final image formats and upon closer inspection you can see that I have finally ‘Star Rated’ both the Jpeg and the PSD file, this takes place within the Adobe Bridge browser. I will perform this rating with all my finished Jpeg and PSD files and finally from here I will then drag the Jpeg’s into a Sub folder of their own called ‘Final Jpeg’s – Edited & Ready for Printing’ (see the list under picture two).
12 – Backing-up my data
After completing all my editing and creating my final Jpegs & PSD’s my initial hard disk (1_Photo’s Main Disk) is complete and my final task is to drag the complete Sub Folder with all the new pictures and edits across and copy it to my back-up hard disk – 2_Photo’s Back-up Disk.
13 – My pictures of choice
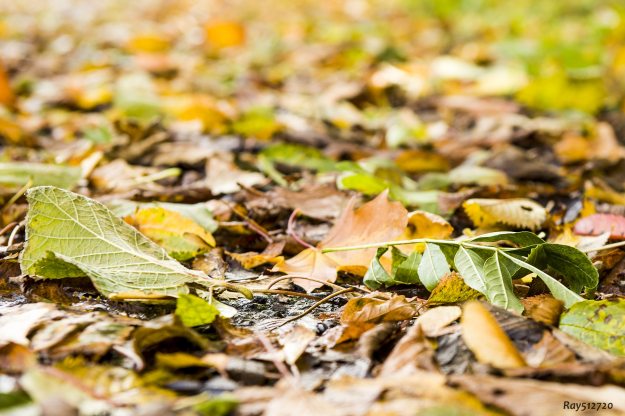
Picture 24 – ‘An Autumn Path’ (Hardwick Village, Oxfordshire)
Camera Details
Camera Nikon D4 (Camera positioned on a tripod)
Speed 1/60th sec
Aperture f5.6
ISO 200
White Balance Setting 6700°K
Lens 24/70 – f2.8 lens
Focal Length 70mm
Comments – In this picture I wanted to capture what it looks like down low on a very windy Autumn day, the colours we see are autumnal browns and greens all on a black asphalt bed. The picture gains its balance from the two central green leaves but I like the textures in this picture and the randomness of autumnal colour spread across the complete frame.
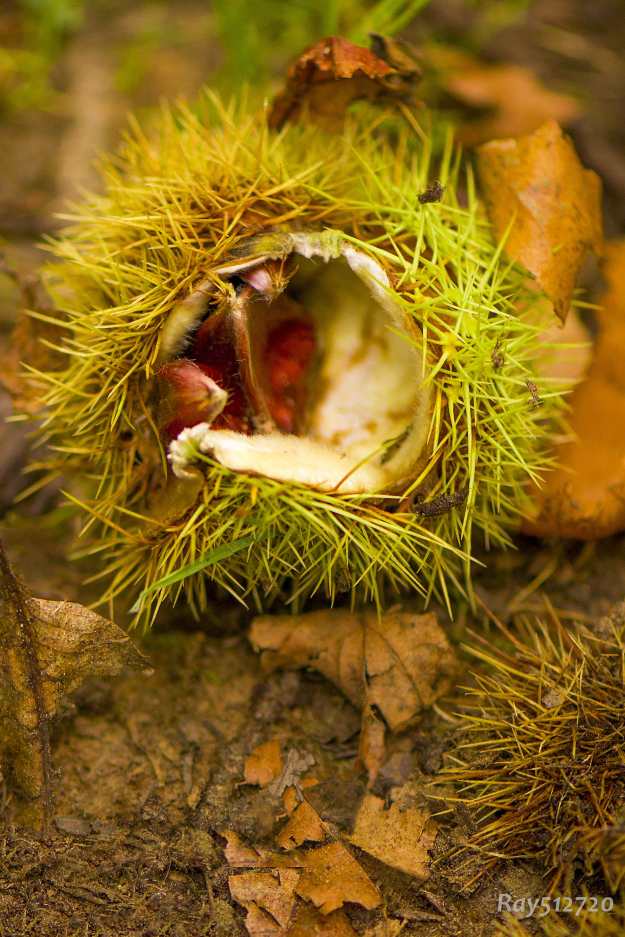
Picture 25 – ‘Fallen Fruit’ (Westonbirt Arboretum)
Camera Details
Camera Nikon D800E (Camera positioned on a tripod)
Speed 1/60th sec
Aperture f3.0
ISO 800
White Balance Setting 6150°K
Lens 105 – f2.8 lens
Focal Length 105mm
Comments – This more classical autumnal shoot of a fallen ‘Sweet Chestnut’ took my eye as a squirrel departed from it as soon as it saw me coming toward. As we can see the squirrel has managed to partially open the outer shell and remove one or two of the nuts. I like the chestnut colours of the fruit inside the partially opened shell against the inner white and outer green texture.
Picture 26 – ‘Golden Brown’ (Westonbirt Arboretum)
Camera Details
Camera Nikon D800E (Camera positioned on a tripod)
Speed 1/90th sec
Aperture f27.0
ISO 1800
White Balance Setting 5500°K
Lens 105 – f2.8 lens
Focal Length 105mm
Comments – This small cluster of leaves caught my eye as I was passing by mainly due to the sun light penetrating its ‘Golden Brown’ colours and leafy texture. I cleared several other fallen leaves away before shooting and concentrated on this little fallen cluster. I didn’t arrange these fallen leaves into their standing positions it was as I found them, sometimes the way nature happens cant be mimicked or repeated. I really like the golden colour contrast of the leaf against the grass.
Picture 27 – ‘Green Fingers’ (Westonbirt Arboretum)
Camera Details
Camera Nikon D800E (Camera handheld)
Speed 1/350th sec
Aperture f4.8
ISO 100
White Balance Setting 5500°K
Lens 105 – f2.8 lens
Focal Length 105mm
Comments – This ‘Horse Chestnut’ tree with its five finger shaped arrangement of leaves was almost at my head height whilst walking by which made it almost impossible to ignore, with the sun penetrating through the green and yellow translucent leaf colours they were practically bursting out at me. I like the herringbone pattern within the leaves shape and also the beginning of colour change due to the call of autumn, just starting to just take effect on the ends of the leaves.
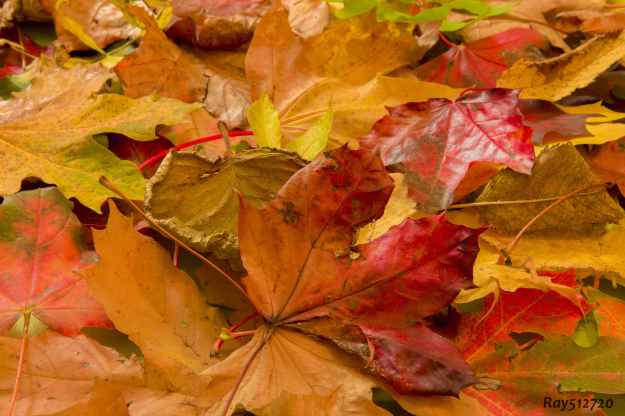
Picture 28 – ‘Autumnal Beauty’ (At home on the floor)
Camera Details
Camera Nikon D4 (Camera positioned on a tripod)
Speed 15 seconds
Aperture f19.0
ISO 100
White Balance Setting 5250°K
Lens 24/70 – f2.8 lens
Focal Length 70mm
Comments – Whilst on one of my walks I came across a row of trees with a vast amount of fallen leaves of all colours beneath and instead of trying to photograph them on the ground I thought it would be good to select as many as I could get into my bag and photograph the whole lot on the floor at home. This way I could arrange them how I wanted without the threat of the wind blowing them away and also take some really long exposures. I took my time as there was no rush and when happy with the way the still life arrangement looked I set the camera up in several positions and began shooting. I really like the autumnal colour balance in this picture, its not a scene or a famous place its just two words for me ‘Autumnal Beauty’
Picture 30 – ‘Fallen Conkers’ (Hardwick Village, Oxfordshire)
Camera Details
Camera Nikon D4 (Camera positioned on a tripod)
Speed 1/60th sec
Aperture f4.8
ISO 100
White Balance Setting 5500°K
Lens 24/70 – f2.8 lens
Focal Length 70mm
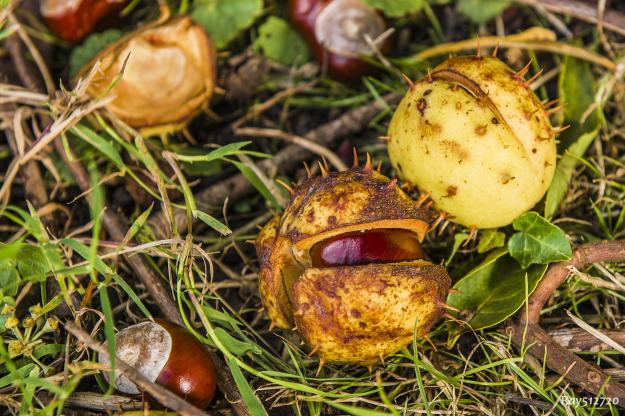
Comments – Autumn would not be autumn without conkers and in my head I wanted a still picture that had the feel of ‘Fallen Conkers’ but from natural circumstance. To achieve this I had to find a tree that was out of the way from passing school children ever hungry of throwing large sticks to knock the conkers out of the trees grasp to ground. I was lucky to stumble across this tree in a small village in Oxfordshire and when I saw it, I couldn’t believe my eyes. I didn’t have to arrange anything in this picture what you see is exactly what I saw. I really like the way that the conker shells bring their three stages of nature to this picture. First we have the fallen shell only just open, second we can see in the foreground the shell which has really split open and the contents are about to fall out and finally in the background part of a shell that has been opened for a few days and has started to discolour. We also have in the lower foreground a lone conker with its white and brown colouring and finally within the partially opened shell we see the lovely wood grained texture of the newly fallen conker.
Picture 31 – ’Flaming Red’ (Westonbirt Arboretum)
Camera Details
Camera Nikon D800E (Camera positioned on a tripod)
Speed 1/45th sec
Aperture f16.0
ISO 800
White Balance Setting 5300°K
Lens 105 – f2.8 lens
Focal Length 105mm
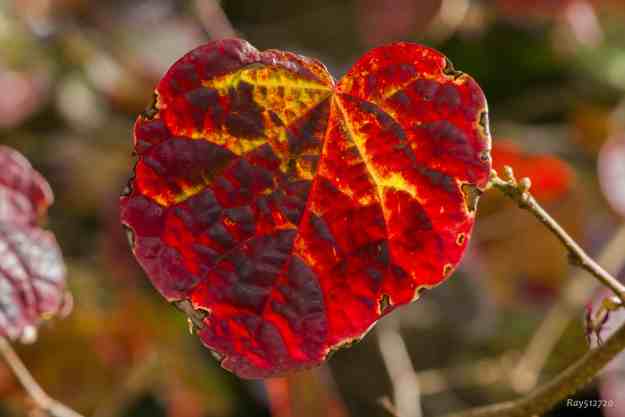
Comments – This picture is probably my favourite of them all and as soon as I saw this tree I just had to get closer. Unlike the other leaves (shown above) this tree had about fifty percent of its leaves on the ground which were in a very poor looking way, hasten to add that this particular tree must start is autumn cycle earlier than most. As I got closer to the tree I noticed that the remaining leaves still attached where mostly this colour and texture shown but this leaf in particular just exploded at me. I took several pictures of this particular leaf and in doing so I really took my time with the camera on a tripod. Its colours are like looking into a lava filled volcano where the yellow represents the surface breaking up and releasing is intense heat and steam.
– – – – – – – – – – – – – – – – – – – – – – – – – – – – – – – – – – – – – – – – – – – – – – – – – – –
My Reflections
This course has taught me and given me a much better understanding of the word ‘Workflow’ until now and looking at this area in detail I used to just move through the various stages without to much thought of what comes next and more importantly what should come next in order to keep my workflow not only cleaner but also more efficient. Writing out my own workflow routine has been a challenge that I have enjoyed and more importantly I have collated a system here that I have in a roundabout way always used but never this accurate or more to the point documented.
In relevance to the exercises and also this assignment, I have tried to show my ability with necessary pictures and comments in putting my workflow routine and thoughts onto paper.
Finally, having completed all the exercises prior to this assignment was a nice way to start this course and I look forward to the next part.
Summary
What I have written and documented above is my current ‘Workflow’ process … but who knows what the future holds. More and more I hear this new buzz word ‘Cloud’ and at present I don’t know anybody using this method for personal storage. I am still curious and as recent headline news told us of famous people having their personal ‘Cloud’ spaces hacked. In relevance of this I guess I am somewhat old fashioned and prefer to back-up and make use of my current storages methods.
With regards to software, we see up-dates all the time but as I stated above in this assignment, I have not seen or witnessed a better way to currently import picture files from memory card and simultaneously rename them. I would like to see in future versions of Adobe Bridge an up-date where it allows the renaming process to be identical when choosing to write to a second hard disk, currently copying to the second hard disk(or back-up disk) simultaneously only copies the RAW & Jpeg camera number. This is a shame as I like my two storage drives to be identical, that to me is true back-up.
Current Books I am Reading
- The Digital Photography Workflow Handbook / Juergens Gulbins – Uwe Steinmueller / Rockynook.
- The Photograph / Graham Clarke / Oxford History of Art.


